Is your once-silent fan now serenading you with an annoying squeak? Before you banish it to the attic or replace it entirely, consider a simple DIY fix that can often restore its quiet hum: oiling the motor. This guide will walk you through the process, helping you diagnose the problem, select the right lubricant, and safely bring your fan back to life. No specialized skills are required, just a little patience and the right approach.
The Mystery of the Squeak: Understanding Your Fan Motor
That irritating squeak usually signals one thing: friction. Over time, the lubricant within your fan motor’s bearings can dry out, thicken, or become contaminated with dust and grime. When this happens, metal parts rub against each other without adequate cushioning, creating that tell-tale noise. The primary culprits are typically dry bushings or bearings that support the motor’s spinning shaft. Lubrication significantly reduces this friction, allowing the shaft to glide smoothly, extending the motor’s lifespan, and restoring tranquility to your living space.
Safety First: Essential Precautions Before You Begin
Before you even think about touching your fan, prioritizing safety is paramount. Ignoring these steps can lead to electrical shock or injury.
- Unplug the Fan: This is the most critical step. Ensure the fan is completely disconnected from its power source. For ceiling fans, also turn off the power at the circuit breaker for the room.
- Allow Cooling Time: If the fan has been running, give it time to cool down before handling the motor.
- Gather Your Tools: Having everything ready minimizes interruptions and helps maintain focus.
- Wear Protective Gear: While not always strictly necessary for this task, eye protection and gloves can prevent minor injuries and keep your hands clean.
Tools and Materials for a Smooth Repair
Having the correct tools and materials makes the job much easier and more effective.
Must-Have Oils
Choosing the right lubricant is crucial. Incorrect oils can cause more harm than good in the long run.
- Non-Detergent Electric Motor Oil: This is often the gold standard. Look for SAE 10, 15, or 20 weight. Some experts also suggest SAE 30 for older, more worn shafts. The key is “non-detergent,” as detergents found in automotive oils can strip away existing lubrication and clog porous bearings.
- Zoom Spout Oiler: This product, often containing turbine oil (ISO 32, equivalent to SAE 15), comes in a convenient bottle with a long, narrow spout, perfect for reaching tight spaces.
- 3-IN-ONE Motor Oil (Blue Can): Specifically designed for electric motors, this is an SAE 20 equivalent and is non-detergent. Ensure you get the “Motor Oil” version in the blue can, not the “Multi-Purpose” in the red can.
|
Our Picks for the Best Pedestal fan in 2026
As an Amazon Associate I earn from qualifying purchases.
|
||
| Num | Product | Action |
|---|---|---|
| 1 | PELONIS 16 inch Pedestal Fan for Bedroom , Oscillating Fan, 3-Speeds, 90° Oscillation, Adjustable Height, Floor Fan, Standing Fan for Living Room, Kitchen, and Home office, Black |

|
| 2 | Lasko 2521 16 Inch 3-Speed Quiet Adjustable Tilting Wide-Area Oscillating Standing Pedestal Fan for Bedroom, Kitchen, Home, and Office, Black |
|
| 3 | Amazon Basics 16" Pedestal Fan with Remote for Bedroom, Living Room, Office, Adjustable Height, Dual-Layered Blades, 3 Speeds, 3 Modes, Timer, Tilt Head, 60W, Black |
|
| 4 | DREO Fan for Bedroom, 2026 Upgraded, 90ft Airflow, 20dB Quiet Fan, 90° Oscillating Standing Fan for Whole Room, DC Motor, 8+H Speeds, 3 Modes, 38-42'' Adjustable Height, 8H Timer, 105° Manual Vertical |
|
| 5 | JRD Fan for Bedroom, 70° Oscillating Standing Fan, 100ft Quiet Pedestal Fans for Home Office, 85° Manual Vertical, Touch+Remote, 24H Timer,32 Wind Speeds, 39-43" Adjustable Height, Air Circulator |
|
| 6 | Lasko 2520 Oscillating Stand Fan,White 16 Inch |
|
| 7 | Lasko Oscillating Cyclone Pedestal Fan, Adjustable Height, Timer, Remote Control, 3 Speeds, for Bedroom, Living Room, Home Office, 18", Black, 1843 |
|
| 8 | DREO Fan for Bedroom, 2026 Upgraded, 90ft Airflow, 20dB Quiet Fan, 90° Oscillating Standing Fan for Whole Room, DC Motor, 8+H Speeds, 3 Modes, 38-42'' Adjustable Height, 8H Timer, 105° Manual Vertical |
|
| 9 | Lasko Pedestal Fan, Oscillating Fan for Bedroom with Adjustable Height and 3 Cooling Speeds, Portable, 18", Black, 1827 |
|
| 10 | DREO Fan for Bedroom, 2026 Upgraded, 90ft Airflow, 20dB Quiet Fan, 90° Oscillating Standing Fan for Whole Room, DC Motor, 8+H Speeds, 3 Modes, 38-42'' Adjustable Height, 8H Timer, 105° Manual Vertical |
|
Oils to Avoid
Using the wrong oil can quickly negate your efforts or even damage your fan motor.
- WD-40: While excellent for loosening rusted parts and displacing water, WD-40 is a penetrating oil, not a long-term lubricant. It evaporates, leaving components dry and potentially worse off.
- Standard Multi-Purpose 3-in-1 (Red Can): This often contains naphtha, which can dissolve existing lubrication and leave behind a sticky residue.
- Automotive Oils with Detergents: As mentioned, detergents are designed to clean and can be detrimental to the porous bearings typically found in electric fans.
- Vegetable Oil or Cooking Sprays: These can gum up and become rancid over time, leading to further motor issues.
- Sewing Machine Oil: Generally too thin for fan motors and may not provide adequate lasting lubrication.
Other Essential Items
- Screwdrivers or Wrenches: To disassemble the fan (Phillips head, flathead, or hex keys may be needed).
- Clean Rags or Paper Towels: For cleaning dust and wiping up excess oil.
- Compressed Air or Soft Brush: To remove dust and debris from the motor and surrounding areas.
- Small Container or Tray: To keep screws and small parts organized.
Step-by-Step: Oiling Your Squeaky Fan Motor
Ready to quiet that noisy fan? Follow these steps carefully for a safe and effective repair.
1. Power Down and Disassemble
First, ensure the fan is unplugged. For ceiling fans, switch off power at the breaker. Now, begin disassembling the fan. This usually involves removing the grille, fan blades, and then carefully opening the motor housing. The exact steps will vary by fan model, so consult your owner’s manual if available. Keep all screws and parts organized in a tray to avoid losing them.
2. Clean Thoroughly
Dust and debris are common enemies of smooth-running fans. Before applying any oil, use compressed air or a soft brush to meticulously clean the motor, fan blades, and any accessible internal components. Wipe down surfaces with a clean rag to remove any accumulated grime. A clean fan operates more efficiently, and lubricant will work better on clean surfaces.
3. Locate Oil Ports or Bearings
This is where you’ll apply the oil. Fan motors typically have either small oil ports (often covered by a cap or plug) or require direct application to the bearings or bushings where the motor shaft rotates.
- Older Fans: Often feature one or two small holes on top of the motor or small refillable cups.
- Newer Fans: May require you to apply oil directly where the motor shaft protrudes from the front and back of the motor housing. Look for the points where the rotating shaft meets the stationary housing; these are usually the bearings. You might need to gently pry open the motor housing further to expose the rear bearing.
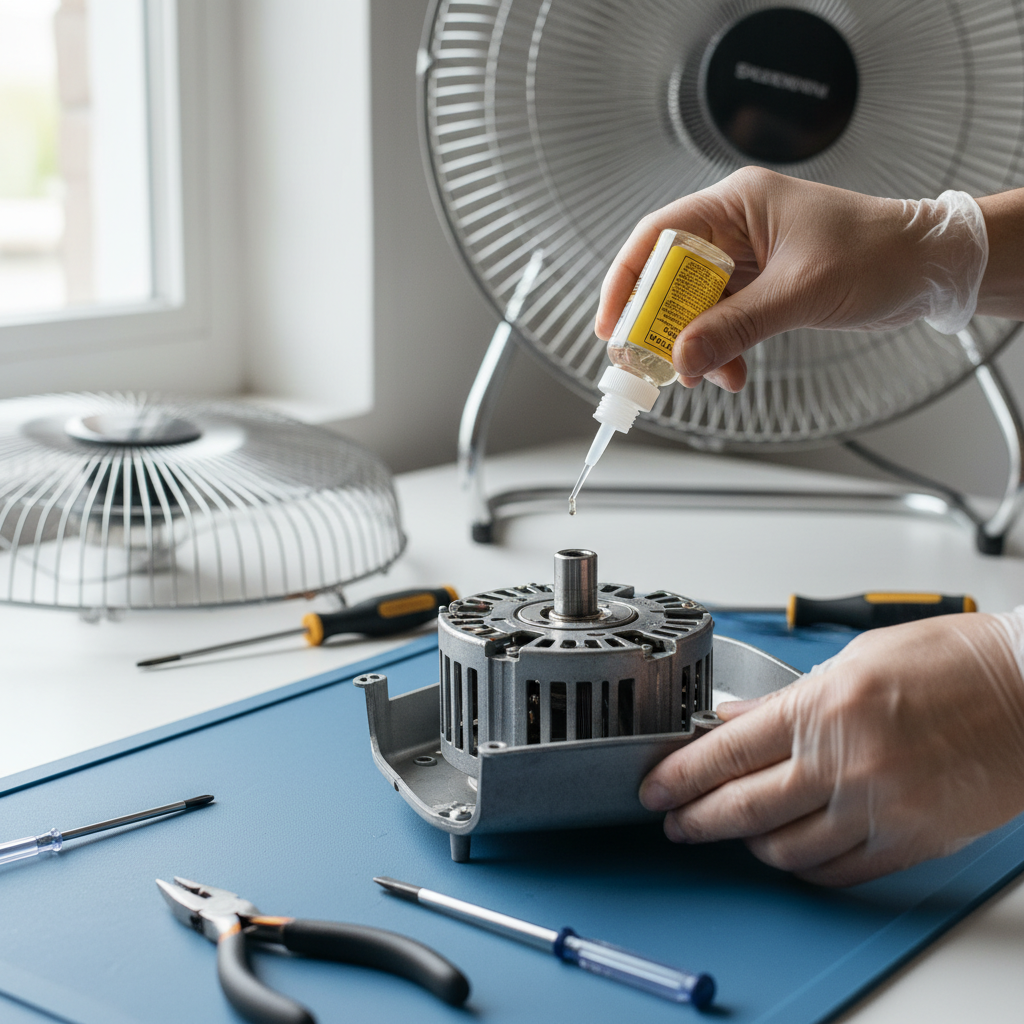
4. Apply Oil Sparingly
Once you’ve located the oiling points, apply 3 to 5 drops of your chosen non-detergent oil. A long, narrow spout on your oil bottle will be immensely helpful for precision. Avoid over-oiling, as excess oil can attract more dust and lead to new problems. The goal is to lubricate the bearings, not to drown the motor.
5. Distribute the Lubricant
After applying the oil, gently rotate the motor shaft or fan blades by hand about 10 to 20 times. This helps the oil work its way into the porous bearings and evenly distribute across the surfaces, ensuring maximum penetration and lubrication. You might even hear the squeak lessen as you do this.
6. Reassemble and Test
Carefully reassemble your fan, ensuring all components are properly aligned and all screws are tightened. Once fully reassembled, plug the fan back in (or restore power for ceiling fans) and turn it on. Listen for the squeak. It should be significantly reduced or completely gone. If you notice any unusual noises or movements, turn the fan off immediately and double-check your assembly.
Troubleshooting: When the Squeak Persists
Sometimes, despite your best efforts, the squeak might linger. Don’t despair; a few additional steps might help.
- Re-oil and Re-clean: If the squeak returns shortly, the bearings might have been severely dry or particularly dirty. Repeat the cleaning and oiling process, ensuring you’ve reached both the top and bottom bearings if accessible.
- Consider a Heavier Oil: For very old fans or those with some shaft wear, a slightly heavier non-detergent oil (like SAE 30) might provide better cushioning and a longer-lasting fix.
- Sealed Bearings: Be aware that many modern fans come with “sealed” bearings that are not designed for lubrication. If your fan has these, or if the noise persists after oiling accessible points, the bearings may be permanently worn and cannot be easily serviced at home.
- Professional Help or Replacement: If the issue isn’t resolved, or if you suspect a deeper mechanical problem, it might be time to consult a professional or consider replacing the fan. Heavily worn bearings or a failing motor may require more than simple lubrication.
Longevity Tips: Keeping Your Fan Running Quietly
Proactive maintenance can prevent future squeaks and extend the life of your fan.
- Regular Cleaning Schedule: Dust is the enemy. Clean your fan blades and motor housing regularly, even if it’s not squeaking. A quick wipe-down or blast with compressed air can prevent buildup that leads to friction.
- Periodic Re-oiling: Depending on usage, plan to re-oil your fan motor every 6 to 12 months. This replenishes the lubricant before it completely dries out.
- Recognize the Signs of Wear: Pay attention to any unusual noises, wobbling, or a noticeable slowdown in fan speed. Addressing these early can prevent more significant damage.
- Optimal Placement: Avoid placing fans in excessively dusty or humid environments, which can hasten lubricant degradation and dust accumulation.
By following these guidelines, you can often silence a squeaky fan motor and enjoy its cool breeze for many more seasons. This simple DIY task not only saves you money but also gives your trusty appliance a new lease on life.
Frequently Asked Questions
Can I use WD-40 on a fan motor?
No, you should not use WD-40 on a fan motor for lubrication. While it can temporarily free up stuck parts, WD-40 is primarily a penetrating oil that evaporates quickly and contains solvents that can actually strip away necessary lubrication, leaving the bearings dry and prone to further damage. Always opt for a non-detergent electric motor oil for lasting lubrication.
How often should I oil my fan motor?
For optimal performance, it’s generally recommended to oil your fan motor every 6 to 12 months, especially if it’s used frequently. If your fan has been squeaking, you might need to re-oil it sooner after the initial fix to ensure the lubricant has fully penetrated the bearings. Regular cleaning also helps maintain the motor’s health.
What if my fan still squeaks after oiling?
If your fan continues to squeak after carefully cleaning and oiling, several factors could be at play. The bearings might be too severely worn for simple lubrication to fix, or your fan could have sealed bearings that aren’t designed for oiling. Ensure you used the correct type of non-detergent oil and applied it to all accessible bearing points. If the problem persists, the fan may require professional repair or replacement.