A dusty fan is more than just an eyesore; it’s a machine struggling to do its job, circulating stale air and potentially exacerbating allergies. Over time, the intricate grills of your pedestal, tower, or box fan become magnets for airborne particles, hindering airflow and reducing efficiency. Learning How To Remove Dust From Fan Grills Easily is a simple task that can significantly improve your indoor air quality, prolong your fan’s lifespan, and ensure you get the most out of its cooling power. This comprehensive guide will walk you through the most effective methods, ensuring your fan runs smoothly, silently, and efficiently.
Understanding Different Fan Grill Designs and Their Cleaning Challenges
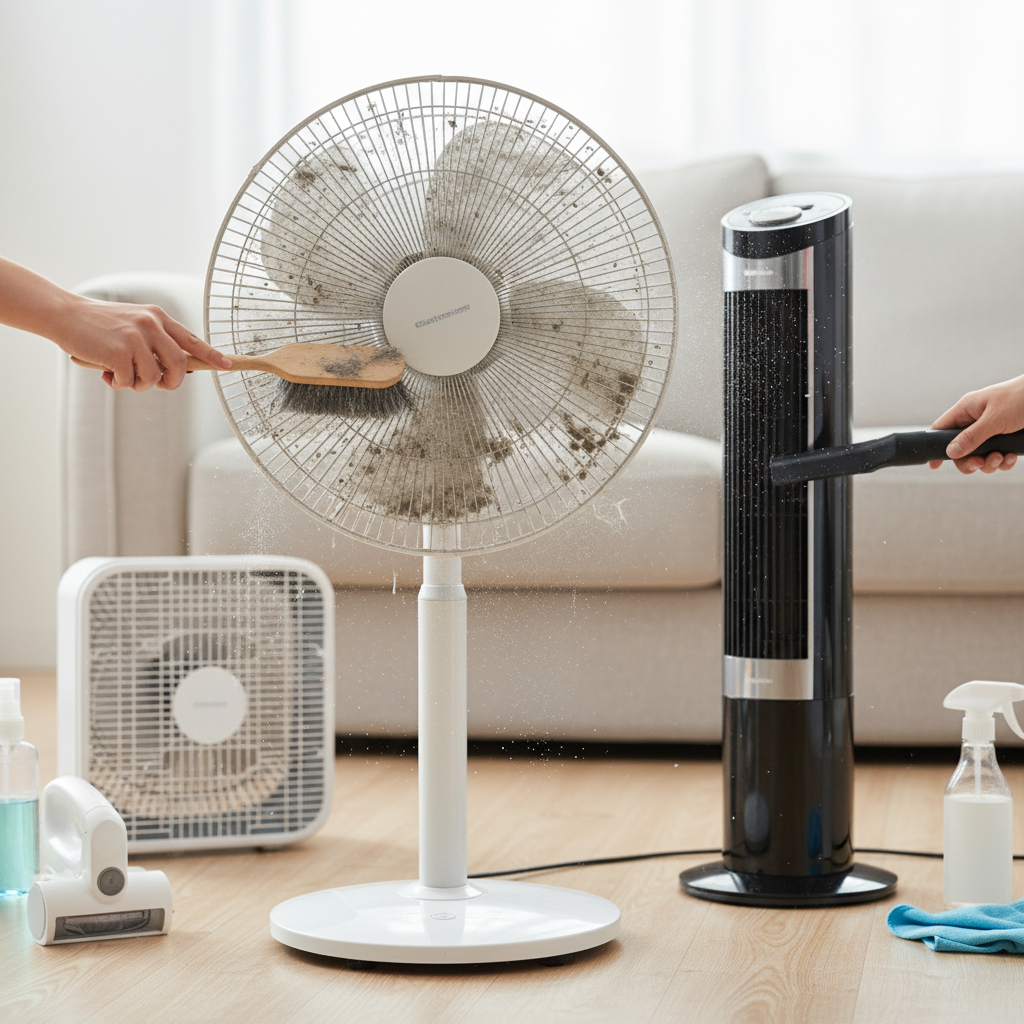
Fans come in various shapes and sizes, and their grill designs often dictate the best approach to cleaning. Recognizing these differences is the first step towards effective dust removal.
Traditional Pedestal and Box Fan Grills
These fans typically feature a front and back grill held together by screws or clips, enclosing visible blades. The open design allows for relatively easy access.
- Pros: Often designed for disassembly, making deep cleaning of blades and grills straightforward. Dust is usually visible and less compacted.
- Cons: Requires tools (screwdriver) and a bit of time for disassembly. Some older models might have stubborn clips.
- Best Suited For: Thorough cleaning when significant dust buildup is present.
|
Our Picks for the Best Pedestal fan in 2026
As an Amazon Associate I earn from qualifying purchases.
|
||
| Num | Product | Action |
|---|---|---|
| 1 | Lasko 2520 Oscillating Stand Fan,White 16 Inch |

|
| 2 | DREO Fan for Bedroom, 2026 Upgraded, 90ft Airflow, 20dB Quiet Fan, 90° Oscillating Standing Fan for Whole Room, DC Motor, 8+H Speeds, 3 Modes, 38-42'' Adjustable Height, 8H Timer, 105° Manual Vertical |
|
| 3 | DREO Fan for Bedroom, 2026 Upgraded, 90ft Airflow, 20dB Quiet Fan, 90° Oscillating Standing Fan for Whole Room, DC Motor, 8+H Speeds, 3 Modes, 38-42'' Adjustable Height, 8H Timer, 105° Manual Vertical |
|
| 4 | Amazon Basics 16" Pedestal Fan with Remote for Bedroom, Living Room, Office, Adjustable Height, Dual-Layered Blades, 3 Speeds, 3 Modes, Timer, Tilt Head, 60W, Black |
|
| 5 | Lasko Oscillating Cyclone Pedestal Fan, Adjustable Height, Timer, Remote Control, 3 Speeds, for Bedroom, Living Room, Home Office, 18", Black, 1843 |
|
| 6 | DREO Fan for Bedroom, 2026 Upgraded, 90ft Airflow, 20dB Quiet Fan, 90° Oscillating Standing Fan for Whole Room, DC Motor, 8+H Speeds, 3 Modes, 38-42'' Adjustable Height, 8H Timer, 105° Manual Vertical |
|
| 7 | PELONIS 16 inch Pedestal Fan for Bedroom , Oscillating Fan, 3-Speeds, 90° Oscillation, Adjustable Height, Floor Fan, Standing Fan for Living Room, Kitchen, and Home office, Black |
|
| 8 | Lasko Pedestal Fan, Oscillating Fan for Bedroom with Adjustable Height and 3 Cooling Speeds, Portable, 18", Black, 1827 |
|
| 9 | JRD Fan for Bedroom, 70° Oscillating Standing Fan, 100ft Quiet Pedestal Fans for Home Office, 85° Manual Vertical, Touch+Remote, 24H Timer,32 Wind Speeds, 39-43" Adjustable Height, Air Circulator |
|
| 10 | Lasko 2521 16 Inch 3-Speed Quiet Adjustable Tilting Wide-Area Oscillating Standing Pedestal Fan for Bedroom, Kitchen, Home, and Office, Black |
|
Tower Fan Grills
Tower fans are known for their sleek, space-saving design, often featuring a vertical, slatted grill that conceals an internal oscillating mechanism.
- Pros: Stylish and compact.
- Cons: The grills are typically non-removable, and accessing the internal components can be challenging. Dust accumulates deep within the narrow slats, making it harder to reach with conventional tools.
- Best Suited For: Regular surface dusting and targeted cleaning with specialized tools like compressed air or narrow brushes.
Bladeless Fan Grills
Modern bladeless fans use an aerodynamic loop amplifier to project a smooth stream of air. They don’t have traditional grills or blades in the conventional sense, but rather air intake vents and an inner loop where dust can gather.
- Pros: Easy to wipe down external surfaces.
- Cons: Internal dust accumulation can be tricky to reach. Requires a different approach than traditional fans.
- Best Suited For: Regular wiping of exterior surfaces and occasional targeted cleaning of intake vents.
Essential Tools and Safety Precautions for Effective Fan Grill Cleaning
Before you begin the cleaning process, gathering the right tools and prioritizing safety are paramount.
Tools You’ll Need
- Microfiber Cloths: Excellent for trapping dust without spreading it, suitable for both dry wiping and damp cleaning.
- Vacuum Cleaner with Brush Attachment: Ideal for suctioning loose dust from accessible grills and even internal components if the fan can be disassembled.
- Compressed Air Can: Perfect for blasting dust out of tight crevices, especially useful for tower and bladeless fans where disassembly isn’t an option.
- Soft-Bristled Brush (e.g., paintbrush, toothbrush): Helps dislodge stubborn dust from grill slats.
- Screwdriver Set: Essential for disassembling traditional fans.
- Mild Dish Soap or All-Purpose Cleaner: For a deeper clean of removable grills and blades.
- Small Bowl or Bucket: For mixing cleaning solution.
- Dry Towel: For drying components after wet cleaning.
Safety First: Before You Begin
- ALWAYS UNPLUG THE FAN: This is the most critical step. Never attempt to clean an electric fan while it is plugged into a power source. This prevents accidental activation and electric shock.
- Gather Your Tools: Having everything ready minimizes interruptions and ensures a smooth process.
- Choose a Well-Ventilated Area: If you’re using compressed air or cleaning solutions, working outdoors or in a well-ventilated room is advisable to avoid inhaling dust or fumes.
- Wear Gloves (Optional): If you have sensitive skin or prefer to keep your hands clean.
Step-by-Step Guide to Cleaning Fan Grills
The method for cleaning will vary slightly depending on your fan type. Here’s a detailed breakdown.
Cleaning Traditional Pedestal and Box Fan Grills (Disassembly Recommended)
This method ensures the most thorough clean.
- Unplug the Fan: Reiterate this crucial step.
- Remove the Front Grill:
- Locate the screws or clips holding the front grill in place.
- Use the appropriate screwdriver (usually Phillips head) to remove screws. For clips, gently pry them open.
- Carefully detach the front grill and set it aside.
- Clean the Fan Blades:
- Once the front grill is off, you’ll have clear access to the blades.
- Use a vacuum cleaner with a brush attachment to remove loose dust.
- For stubborn grime, wipe the blades with a damp microfiber cloth lightly dampened with a mild soap solution.
- Ensure blades are completely dry before reassembly.
- Clean the Grills:
- Take both the front and back grills (if easily removable) to a sink or outdoors.
- You can dry brush them first to remove loose dust.
- For a deep clean, wash them with warm water and a few drops of mild dish soap. Use a soft brush to scrub away any stuck-on dirt.
- Rinse thoroughly to remove all soap residue.
- Lay them on a dry towel or hang them to air dry completely. This is vital to prevent electrical hazards and rust.
- Clean the Motor Housing:
- With the grills and blades removed, gently wipe down the motor housing and any exposed components with a dry microfiber cloth.
- Do not use water or cleaning solutions directly on electrical components.
- Reassemble the Fan:
- Once all parts are completely dry, carefully reattach the blades (if removed), then the back grill, and finally the front grill.
- Ensure all screws or clips are securely fastened.
Cleaning Tower Fan Grills (Without Disassembly)
Since tower fans are often not designed for easy disassembly, a different approach is needed.
- Unplug the Fan: Always start here.
- Vacuum External Grills: Use your vacuum cleaner with a narrow brush attachment to suction dust from the exterior slats. Move the attachment along the entire length of the grill.
- Blast with Compressed Air: This is your best friend for tower fans.
- Direct short bursts of compressed air into the grill slats, working from top to bottom.
- You’ll see dust clouds emerge from the opposite side – it’s helpful to have a vacuum running nearby or be outdoors to catch this dust.
- Pay special attention to the intake vents at the bottom or back of the fan, as these are major dust collection points.
- Wipe Down Exterior: Use a slightly damp microfiber cloth to wipe down the exterior surface of the fan, including the control panel and base.
- Clean the Base/Filter (if applicable): Some tower fans have a removable base filter. Consult your manual for instructions on how to clean or replace it.
Cleaning Bladeless Fan Grills/Vents
Bladeless fans require a gentler touch due to their internal mechanisms.
- Unplug the Fan: Safety first.
- Wipe Exterior Surfaces: Use a dry or slightly damp microfiber cloth to wipe down the entire exterior, including the loop amplifier and the base. Dust tends to cling to the smooth surfaces.
- Clean Air Intake Vents: These are usually located around the base.
- Use a vacuum cleaner with a small brush attachment to suction dust from these vents.
- Alternatively, use compressed air to blow dust out of the vents.
- Clean Inside the Loop (if accessible): Some models allow for gentle wiping inside the loop with a dry cloth or a flexible dusting tool, but avoid pushing anything deep inside.
- Consult Manufacturer’s Guide: For specific models, always refer to the user manual for detailed cleaning instructions, especially for internal components.
Deep Cleaning for Stubborn Dust and Grime
Sometimes, dust mixes with humidity or grease, forming a stubborn film. For such cases, a deeper clean is necessary.
- For Removable Grills and Blades: After removing them, soak the plastic or metal parts in a basin of warm, soapy water for 15-30 minutes. This helps loosen caked-on grime. Then, scrub with a soft brush, rinse thoroughly, and ensure they are completely dry before reassembling.
- For Non-Removable Parts (e.g., motor housing, tower fan interiors): If you encounter stubborn spots on non-electrical exterior parts, dampen a microfiber cloth with a very diluted all-purpose cleaner and gently wipe. Immediately follow with a dry cloth to prevent moisture damage. Never spray cleaner directly onto the fan.
Tips for Cleaning Fan Blades
While the focus is on grills, blades are often the primary air-movers and dust collectors.
- Prioritize Safety: Always ensure the fan is unplugged before touching the blades.
- Gentle Handling: Fan blades, especially plastic ones, can be brittle. Handle them carefully to avoid bending or breaking.
- Use the Right Tools: For loose dust, a vacuum brush attachment is excellent. For sticky dust, a damp microfiber cloth with a mild soap solution is effective. For tight spaces, a soft paintbrush can reach between blades.
- Thorough Drying: After any wet cleaning, ensure blades are bone dry before reassembly to prevent water damage to the motor or electrical components.
Preventative Measures to Keep Your Fan Grills Dust-Free Longer
Keeping your fan clean requires less effort with a few proactive steps.
- Regular Light Dusting: Incorporate your fan into your regular dusting routine. A quick wipe-down with a microfiber cloth once a week can prevent significant buildup.
- Use a Fan Cover: When your fan is not in use, especially during off-seasons, cover it with a dedicated fan cover or even an old pillowcase. This acts as a barrier against dust accumulation.
- Clean Your Environment: A dustier room means a dustier fan. Regularly vacuuming, dusting surfaces, and cleaning air filters (in your HVAC system or air purifier) will reduce airborne dust particles, benefiting your fan.
- Position Your Fan Strategically: Avoid placing your fan directly in areas with high dust concentration, such as near open windows in dusty environments or on the floor in carpeted rooms where dust settles.
- Run an Air Purifier: An air purifier running in the same room can capture many of the airborne particles that would otherwise end up on your fan grills.
Common Mistakes to Avoid When Cleaning Fan Grills
To ensure a safe and effective cleaning process, steer clear of these common errors.
- Forgetting to Unplug: This is the most dangerous mistake, risking electric shock or injury.
- Using Too Much Water: Water and electronics don’t mix. Over-saturating cloths or spraying water directly onto the fan can damage electrical components.
- Not Drying Parts Completely: Reassembling a fan with damp components can lead to rust, mildew, or electrical shorts.
- Using Harsh Chemicals: Abrasive cleaners or solvents can damage the plastic or paint finish of your fan. Stick to mild soap and water.
- Bending Blades or Grills: Being too forceful can damage the fan’s balance or structural integrity, leading to noisy operation or reduced efficiency.
- Neglecting the Motor Housing: While you shouldn’t get it wet, letting dust accumulate excessively on the motor can cause it to overheat.
Conclusion
Keeping your fan grills clean is a simple yet impactful aspect of home maintenance. By understanding the nuances of different fan types, gathering the right tools, and following a methodical cleaning process, you can easily remove dust from fan grills and ensure your appliance operates at peak performance. Regular cleaning not only extends the life of your fan and boosts its efficiency but also contributes to a healthier indoor environment by circulating cleaner air. Make fan grill cleaning a regular habit, and you’ll enjoy a cooler, fresher, and more comfortable living space.
What are your go-to preventative measures to keep your fan dust-free between deep cleans?
Câu Hỏi Thường Gặp
How often should I clean my fan grills?
It’s recommended to lightly dust your fan grills weekly and perform a more thorough cleaning (including disassembly if possible) every 1-3 months, depending on how frequently the fan is used and how dusty your environment is. This routine helps maintain optimal performance and air quality.
Can I put my fan grills in the dishwasher?
While some plastic fan grills might seem suitable for a dishwasher, it’s generally not recommended. High heat from a dishwasher can warp or damage plastic components, and harsh detergents can strip finishes. Hand-washing with mild soap and water is the safest and most effective method.
How do I clean a fan grill without taking it apart?
For fans that can’t be easily disassembled, use a vacuum cleaner with a brush attachment to suction dust from the exterior. Follow up with compressed air to dislodge dust from hard-to-reach internal slats. Finish by wiping down the exterior with a damp microfiber cloth for a clean finish.
Is it safe to use water to clean fan blades?
Yes, it is safe to use water and mild soap on removable plastic or metal fan blades, provided they are completely removed from the motor housing. Ensure the blades are thoroughly dried before being reattached to the fan to prevent any electrical hazards or rust. Never apply water directly to the motor.
Why does my fan get so dusty, even after I clean it?
Fans actively pull air, and along with air, they inevitably pull in airborne dust, pet dander, and other particles present in your environment. Regular cleaning of your home, using an air purifier, and covering your fan when not in use can significantly reduce the rate of dust accumulation on your fan grills.