Is your once-trusty fan now creating a symphony of squeaks, grinding, or a low, unsettling hum? These sounds are often the tell-tale signs of dry or worn fan bearings, components critical for smooth and efficient operation. Just like any moving part, fan bearings require proper lubrication to reduce friction, prevent wear, and ensure your fan delivers optimal cooling without the distracting noise. This comprehensive guide will walk you through the process of lubricating your fan’s bearings with oil, helping you restore its quiet efficiency and extend its lifespan.
Understanding Your Fan’s Bearings
Before you begin, it’s essential to understand the type of bearings your fan uses, as this dictates the lubrication method and type of lubricant. Most household fans typically feature one of two main bearing types: sleeve bearings or ball bearings.
Sleeve Bearings vs. Ball Bearings
- Sleeve Bearings (Bushings): These are common in many electric fans. They consist of a soft, porous material (often bronze or brass) impregnated with oil during manufacturing. Over time, this oil can dry out or become contaminated. Sleeve bearings are designed to be lubricated with oil.
- Ball Bearings: Less common in standard household fans but found in some higher-end models or industrial applications, ball bearings contain a series of small metal balls that reduce friction. Ball bearings usually require grease or a thicker SAE40 motor oil, not the lighter oils typically used for sleeve bearings. Using mineral oil on ball bearings can lead to a noticeable hissing sound. [cite: 2-2]
|
Our Picks for the Best Pedestal fan in 2026
As an Amazon Associate I earn from qualifying purchases.
|
||
| Num | Product | Action |
|---|---|---|
| 1 | Lasko 2521 16 Inch 3-Speed Quiet Adjustable Tilting Wide-Area Oscillating Standing Pedestal Fan for Bedroom, Kitchen, Home, and Office, Black |

|
| 2 | DREO Fan for Bedroom, 2026 Upgraded, 90ft Airflow, 20dB Quiet Fan, 90° Oscillating Standing Fan for Whole Room, DC Motor, 8+H Speeds, 3 Modes, 38-42'' Adjustable Height, 8H Timer, 105° Manual Vertical |
|
| 3 | Lasko Oscillating Cyclone Pedestal Fan, Adjustable Height, Timer, Remote Control, 3 Speeds, for Bedroom, Living Room, Home Office, 18", Black, 1843 |
|
| 4 | PELONIS 16 inch Pedestal Fan for Bedroom , Oscillating Fan, 3-Speeds, 90° Oscillation, Adjustable Height, Floor Fan, Standing Fan for Living Room, Kitchen, and Home office, Black |
|
| 5 | Amazon Basics 16" Pedestal Fan with Remote for Bedroom, Living Room, Office, Adjustable Height, Dual-Layered Blades, 3 Speeds, 3 Modes, Timer, Tilt Head, 60W, Black |
|
| 6 | DREO Fan for Bedroom, 2026 Upgraded, 90ft Airflow, 20dB Quiet Fan, 90° Oscillating Standing Fan for Whole Room, DC Motor, 8+H Speeds, 3 Modes, 38-42'' Adjustable Height, 8H Timer, 105° Manual Vertical |
|
| 7 | DREO Fan for Bedroom, 2026 Upgraded, 90ft Airflow, 20dB Quiet Fan, 90° Oscillating Standing Fan for Whole Room, DC Motor, 8+H Speeds, 3 Modes, 38-42'' Adjustable Height, 8H Timer, 105° Manual Vertical |
|
| 8 | Lasko 2520 Oscillating Stand Fan,White 16 Inch |
|
| 9 | Lasko Pedestal Fan, Oscillating Fan for Bedroom with Adjustable Height and 3 Cooling Speeds, Portable, 18", Black, 1827 |
|
| 10 | JRD Fan for Bedroom, 70° Oscillating Standing Fan, 100ft Quiet Pedestal Fans for Home Office, 85° Manual Vertical, Touch+Remote, 24H Timer,32 Wind Speeds, 39-43" Adjustable Height, Air Circulator |
|
Identifying Lubricable vs. Sealed Bearings
Many modern, inexpensive fans come with “sealed” bearings, which are not designed for maintenance or lubrication. Attempting to oil these often yields no benefit and can sometimes cause damage. However, many older or higher-quality fans, including many pedestal fans, have accessible bearings that can be lubricated. Look for small oil ports or areas where the shaft enters the motor housing. If there are no visible access points, it may have sealed bearings.
Signs Your Fan Bearings Need Lubrication
Recognizing the symptoms of dry bearings early can prevent further damage and costly replacements. Here are the key indicators:
- Noises: The most common sign is increased noise. Listen for squealing, grinding, squeaking, or rattling sounds, especially when the fan first starts up. [cite: 3-1, 3-3, 3-5, 5-5] These noises indicate metal-on-metal friction.
- Reduced Performance: A fan with dry bearings may start slowly, struggle to reach its usual speed, or provide noticeably weaker airflow. Erratic spinning or the fan stopping prematurely after being powered down can also signal bearing issues. [cite: 3-1]
- Increased Vibration: As bearings wear or dry out, they can lead to excessive vibration throughout the fan’s housing, which you might feel or hear. [cite: 3-1]
- Overheating: Friction generates heat. If your fan motor feels unusually hot to the touch, it could be a sign that the bearings are working harder than they should, leading to potential motor burnout if left unaddressed. [cite: 3-5, 5-1]
Choosing the Right Oil for Fan Bearings
Selecting the correct lubricant is crucial for effective and long-lasting results. The wrong type of oil can do more harm than good.
Recommended Oils
For fan bearings, especially sleeve bearings, you should use non-detergent electric motor oil. Detergents in motor oils can cause issues in electric motors. [cite: 1-4, 1-5] Excellent choices include:
- Sewing Machine Oil: This is a light, filtered mineral oil commonly recommended for its appropriate viscosity and purity. [cite: 1-2, 2-1, 2-3]
- 3-in-1 Oil (Blue Bottle): Specifically look for the blue-label “3-in-1 Electric Motor Oil” or “Turbine Oil.” The standard black bottle 3-in-1 oil is often too thin and behaves more like a penetrating oil (like WD-40) than a long-term lubricant. [cite: 1-5, 2-4, 2-5]
- Zoom Spout Turbine Oil: Many experts recommend this oil, specifically designed for electric motors and HVAC applications. [cite: 2-4, 2-5]
- Light Mineral Oil: Any light, filtered mineral oil is generally suitable. [cite: 1-2]
- SAE15 or 20wt Non-Detergent Motor Oil: These can also be effective alternatives. [cite: 1-5]
- Synthetic Motor Oil (e.g., 5W30): Some users have reported success with a few drops of synthetic motor oil. [cite: 1-5]
Oils to Avoid
- WD-40 (as a lubricant): While useful for cleaning and freeing seized parts, WD-40 is primarily a water displacement spray and rust preventative, not a long-term lubricant. Its lubricating properties evaporate quickly, leaving bearings dry again. [cite: 1-2, 2-3, 2-5] It can be used as a solvent for cleaning but must be thoroughly dried. [cite: 2-1, 4-1]
- Detergent Motor Oils: Modern automotive engine oils contain detergents that can break down deposits. These are not suitable for electric motor bearings and can cause problems. [cite: 1-4, 1-5]
- Cooking Oils (e.g., olive oil): These are not designed for mechanical parts and can turn gummy, attracting dust and causing more problems.
- Grease (for sleeve bearings): Grease is typically too thick for sleeve bearings and can impede their movement, often recommended for ball bearings instead. [cite: 2-1, 2-2]
Step-by-Step Guide: Lubricating Fan Bearings with Oil
Before starting, ensure you have your chosen non-detergent oil, a screwdriver set, a clean cloth, and a solvent (like brake cleaner or isopropyl alcohol) if a thorough cleaning is needed.
1. Safety First: Disconnect Power
Always begin by unplugging the fan from its power source. Safety is paramount when working with electrical appliances.
2. Disassembly: Accessing the Motor
You’ll need to disassemble the fan to reach the motor and its bearings. The process varies by fan type, but generally involves:
- Removing the front grille, fan blade, and rear grille.
- Detaching the motor housing from the stand (for pedestal fans) or ceiling mount (for ceiling fans).
- Carefully opening the motor casing to expose the shaft and bearings. There are usually two bearings: one at the front (near the blades) and one at the back of the motor. [cite: 1-1, 1-5]
3. Cleaning the Bearings and Shaft
This is a critical step often overlooked. Old lubricant can become gummy, and dust can accumulate, hindering the new oil’s effectiveness.
- Wipe Away Debris: Use a clean cloth to wipe away any visible dust, grime, or old oil from the shaft and around the bearing areas.
- Flush Old Lubricant (if necessary): If the bearings are particularly sticky or gummed up, you might need to flush them. Apply a small amount of brake cleaner or isopropyl alcohol to the shaft where it enters the bearing, rotating the shaft by hand. Ensure to dry the area completely afterward, as solvents can displace lubricants. [cite: 2-1, 4-1]
- Clean the Shaft: The shaft should be clean and smooth. Remove any gunk or varnish that may have built up.
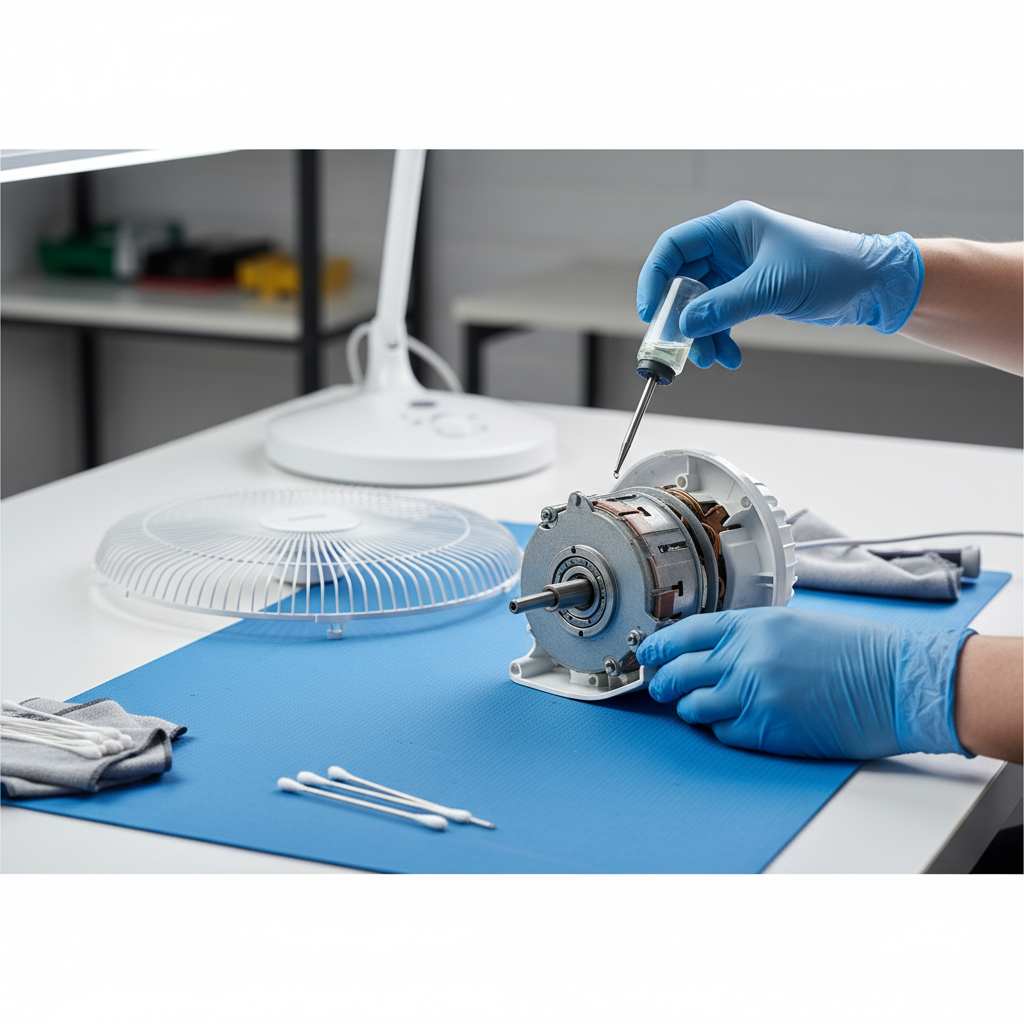
4. Applying the Oil
With the bearings clean and accessible, it’s time to apply the fresh oil.
- Locate Bearings: Identify the oil points, typically small seams or holes where the shaft enters the motor housing, both at the front and back of the motor. [cite: 1-1]
- Apply Drops: Drip 3 to 5 drops of your chosen non-detergent electric motor oil directly into each bearing. [cite: 1-1, 1-3, 1-5, 2-2]
- Avoid Overfilling: Do not overfill the oil well, as centrifugal force during operation can displace excess oil and create a mess. [cite: 1-2]
5. Working the Oil In
After applying the oil:
- Spin the Shaft: Gently spin the fan shaft manually about 10-15 times. This helps the oil penetrate the bearing thoroughly and evenly. You may need to let it soak in for a few minutes and repeat the process if the fan was very dry. [cite: 1-1, 1-5]
- Reorient and Repeat: If possible, turn the motor upside down to access the other bearing and repeat the oiling and spinning process. [cite: 1-1]
6. Reassembly and Testing
Once you’re confident the oil has been worked into the bearings:
- Reassemble the Fan: Carefully put the motor casing back together, followed by the fan blade, grilles, and any other components. Ensure all screws are tightened and parts are aligned correctly.
- Test: Plug the fan back in and turn it on. You should notice a significant reduction in noise and smoother operation. If it still sounds dry, you might need to apply a few more drops of oil and spin the shaft again.
Maintenance Tips for Longevity
Regular care can prevent premature bearing wear and extend your fan’s life for years.
- Regular Cleaning: Dust and dirt are enemies of bearings. Periodically clean your fan blades, grilles, and motor housing to prevent accumulation that can work its way into the bearings.
- Lubrication Frequency: For general household fans, a drop of oil every few years, or when you notice the first signs of noise, is usually sufficient. [cite: 5-2] For industrial fans, always follow the manufacturer’s recommended lubrication schedule in the user manual. [cite: 5-1]
- Consider Replacement: While lubrication can fix many issues, some bearings may be too worn or damaged. If noise persists or the fan struggles after lubrication, it might be time to replace the fan or, if feasible, the bearings themselves. If a bearing has failed, replacing both bearings is recommended. [cite: 4-4]
“Proper lubrication is not just about silencing a noisy fan; it’s about preserving the motor’s integrity and maximizing the efficiency of your cooling investment.” – Admin, reviewkdp.com
Conclusion
Lubricating your fan bearings with the right oil is a simple yet impactful maintenance task that can dramatically improve your fan’s performance and lifespan. By following these steps and choosing appropriate non-detergent electric motor oil, you can say goodbye to annoying squeaks and grinding, welcoming back the quiet, efficient airflow your home deserves. This small effort not only saves you money on replacements but also contributes to a more sustainable approach by extending the life of your appliances. What other home appliance maintenance tasks do you think are commonly overlooked?
Frequently Asked Questions
What type of oil is best for pedestal fan bearings?
For most Pedestal Fan bearings, which are typically sleeve bearings, non-detergent electric motor oil is ideal. Good options include sewing machine oil, Zoom Spout turbine oil, or the blue-bottle 3-in-1 electric motor oil. Avoid multi-purpose lubricants like WD-40, as they are not designed for long-term lubrication.
How often should I lubricate my fan bearings?
The frequency depends on usage, but for household fans, lubricating the bearings every few years or at the first sign of increased noise or slow operation is generally sufficient. Industrial fans may require more frequent lubrication according to manufacturer guidelines. [cite: 5-2]
Can I use WD-40 to lubricate fan bearings?
While WD-40 can free stuck parts, it is not a suitable long-term lubricant for fan bearings. Its lubricating components evaporate quickly, leaving the bearings dry again and potentially attracting more dust. It can be used as a solvent for cleaning prior to oiling, but must be completely dried. [cite: 2-1, 2-3, 2-5]
What happens if I don’t lubricate my fan bearings?
Neglecting lubrication can lead to increased friction, causing the fan to become noisy (squealing, grinding), vibrate excessively, run slower, or even overheat. Over time, this can cause irreversible damage to the motor and lead to premature fan failure. [cite: 3-5, 5-1]
How do I know if my fan has sealed bearings?
Sealed bearings typically do not have visible oil ports or accessible points for lubrication. If you’ve disassembled your fan’s motor and cannot find any small holes or seams where oil can be applied to the shaft, it likely has sealed bearings that are not designed for user maintenance.